
Starting to explore the night sky can be intimidating, especially if you’re new to stargazing. The vastness of the universe and the numerous celestial objects to discover can make it feel overwhelming. But with a little guidance, you’ll be able to unlock the secrets of the night sky in no time. A beginner’s guide to stargazing is essential for those looking to get started tonight. This comprehensive resource will cover everything from choosing the right equipment to mastering basic techniques and understanding key concepts. You’ll learn how to properly use binoculars or a telescope, identify constellations, and even spot planets in our solar system. By the end of this guide, you’ll be equipped with the knowledge to start stargazing on your own and begin uncovering the mysteries of the universe.
Getting Started with Stargazing
To start stargazing, you’ll first need a clear understanding of what equipment is necessary and how to set it up for optimal viewing. Let’s begin with the basics of stargazing gear.
Understanding Your Sky: Types of Skies and Atmospheric Conditions
Clear skies are essential for stargazing, but you may encounter various types of skies that can impact your viewing experience. A clear sky is ideal, with no clouds to obstruct your view. However, even on a clear night, atmospheric conditions like temperature and humidity can affect what you see. For instance, when the air is hot and humid, it can distort light from distant stars, making them appear more diffuse than they actually are.
Cloudy skies are another common challenge for stargazers. Cumulus clouds, often seen in fair weather, can be harmless, but thick stratus or nimbus clouds can block out entire constellations. Knowing the difference between these types of clouds is crucial to determining whether it’s worth waiting for a break in the cloud cover.
Light pollution from nearby cities or towns can also impact stargazing. This type of pollution scatters light from streetlights and buildings, making it difficult to see faint stars. If you’re stargazing in an urban area, consider finding a spot away from city lights or using specialized light-pollution filters for your telescope.
Air pollution is another atmospheric condition that can affect stargazing. Tiny particles in the air can scatter light, reducing visibility and making objects appear more hazy than they should. Check local forecasts for air quality before heading out to stargaze.
Choosing the Right Location for Stargazing
When selecting a location for stargazing, consider three key factors: distance from city lights, accessibility, and safety. A dark sky is essential for stargazing, so try to find a spot at least 20 miles away from urban areas or other light pollution sources. This will make it easier to see more stars and celestial objects.
Accessibility refers to how easy it is to reach the location with your equipment. Opt for sites that are close to parking or have minimal hiking requirements. For example, consider nearby state parks, national forests, or designated dark-sky preserves. These areas often have well-marked trails and facilities that make stargazing more comfortable.
Safety should also be a top priority when choosing a location. Avoid areas with loose rocks, steep slopes, or other hazards that could pose a risk to you or others. Also, consider the proximity to emergency services in case of an unexpected situation. Additionally, check for any local regulations or restrictions on stargazing activities.
Basic Equipment Needed for Stargazing
You’ll need a few essential items to get started with stargazing. Binoculars are an excellent starting point, offering a good balance between price and image quality. Look for 7×50 or 10×50 models, which provide a wide field of view and decent magnification. Telescopes come in various types, including refractors, reflectors, and compound telescopes. Beginners often prefer refractor or reflector telescopes, as they are generally easier to use.
A star chart is also crucial for planning your stargazing sessions. You can purchase a printed star chart or download mobile apps like Sky Map or Stellarium Mobile that provide interactive charts. These tools help you identify constellations and locate celestial objects in real-time. Don’t forget red light flashlights, which preserve night vision by minimizing blue light emission. This is particularly important if you plan to stargaze frequently.
Some additional accessories can enhance your experience, such as a star diagonal for comfortable viewing or a dew shield to protect your telescope from moisture. Consider investing in a sturdy tripod to stabilize your binoculars or telescope, ensuring smooth and clear images. Remember to check the weather forecast and choose a location with minimal light pollution for optimal stargazing conditions.
Understanding the Night Sky: Stars, Constellations, and Planets
Let’s start by understanding how to identify the main players in our night sky: stars, constellations, and planets. These celestial bodies will be your best friends as you begin to explore the universe.
Recognizing Constellations: History and Patterns
Constellations have been a part of human culture for thousands of years, with origins rooted in ancient mythology. The 88 recognized constellations are based on the patterns and shapes formed by the brightest stars in the night sky. These patterns were often associated with myths and legends from different cultures, such as Orion’s belt or Cassiopeia’s chair.
To recognize constellations, start by familiarizing yourself with their names and locations. Look for the most prominent stars in each constellation and try to connect them to form a pattern or shape. Many constellations are named after their mythological associations, so knowing these stories can help you better appreciate the patterns you see in the sky.
In ancient times, astronomers used the positions of constellations to navigate and keep track of time. Today, we use similar principles to locate them in the night sky. For beginners, it’s best to start with the most visible constellations, such as the Big Dipper or Orion. These patterns are relatively easy to spot and can help you develop your stargazing skills. With practice, you’ll become more comfortable recognizing constellations and their associated shapes.
Identifying Key Stars and Asterisms
When you’re starting out with stargazing, it can be daunting to identify key stars and asterisms. Begin by understanding the basics of star identification: magnitude, distance, and color. Magnitude is a measure of how bright a star appears from Earth; smaller magnitudes indicate brighter stars. Distances vary greatly, ranging from nearby red dwarfs to distant blue giants. Colors can also give you clues about a star’s temperature and composition.
Look for prominent asterisms like the Big Dipper and Cassiopeia. The Big Dipper is easy to spot due to its distinctive seven-star pattern. You can locate Polaris, the North Star, by finding the two stars at the end of the “bowl” opposite the handle. Cassiopeia’s W-shaped constellation glows in the northern sky around September and October. These asterisms serve as navigational aids and can help you find other constellations.
For a quick and easy way to identify these patterns, try using an astronomy app or mobile planetarium software on your smartphone. These tools often include interactive star maps that allow you to view the night sky from anywhere in the world.
Planetary Observations: Understanding What You See
When observing planets in our solar system using binoculars or a telescope, it’s essential to understand what you’re looking at. Start with the largest planet, Jupiter, which appears as a bright, distinct disk due to its massive size and cloudy atmosphere. Its four brightest moons, Io, Europa, Ganymede, and Callisto, can be seen as smaller dots nearby.
Moving on to Saturn, look for its distinctive ring system, visible as a halo around the planet. Be cautious not to confuse it with a halo effect caused by atmospheric conditions. Mars is often referred to as the “Red Planet,” but its reddish hue may not be immediately apparent due to its relatively small size and low surface brightness.
For Earth and Venus, the most notable feature is their brightness; they can appear up to 10 times brighter than any other planet. Be aware that Venus has a strong scintillation effect due to its thick atmosphere, which causes it to twinkle rapidly. Keep in mind that Mercury’s proximity to the Sun makes it challenging to observe safely without proper eye protection.
When viewing planets through binoculars or a telescope, use low magnification and focus on observing their shapes, sizes, and relative brightnesses. This will help you get accustomed to recognizing these celestial bodies without over-relying on high-powered optics.
Stargazing Techniques: Aiming Your Gaze
To get started, you’ll want to learn how to aim your gaze at specific celestial objects and navigate through the night sky with ease. Understanding how to use a star chart is essential for successful stargazing.
Aligning with the Celestial Equator
When making observations, aligning your stargazing equipment with the celestial equator is crucial for accurate readings. The celestial equator is an imaginary line that divides the Earth into two hemispheres and serves as a reference point for astronomers. This alignment ensures that you’re observing objects in their correct position relative to the Earth’s rotation.
To align your equipment, refer to star charts or use mobile apps specifically designed for stargazing. These tools provide a visual representation of the night sky, allowing you to identify key stars and constellations. Look for the celestial equator line on the chart or app, which is usually marked with an “E” or an arrow.
When using a star chart, rotate your equipment so that the celestial equator line aligns with the horizon. If using a mobile app, use its built-in compass feature to orient your device according to the celestial equator’s direction. This may require some trial and error, but it will help you achieve accurate observations.
Locating Bright Stars and Deep-Sky Objects
To locate bright stars and deep-sky objects, start by familiarizing yourself with the major constellations. These patterns serve as a map to guide you through the night sky. You can use a planisphere or mobile app that displays the constellations for your location and time of year. Identify the brightest stars in each constellation, such as Sirius in Canis Major or Betelgeuse in Orion.
Next, look for bright nebulae like the Orion Nebula (M42) or the Pleiades (M45). These gas clouds are visible to the naked eye on clear nights and offer a stunning sight. You can also use binoculars to spot smaller deep-sky objects like globular clusters and open clusters.
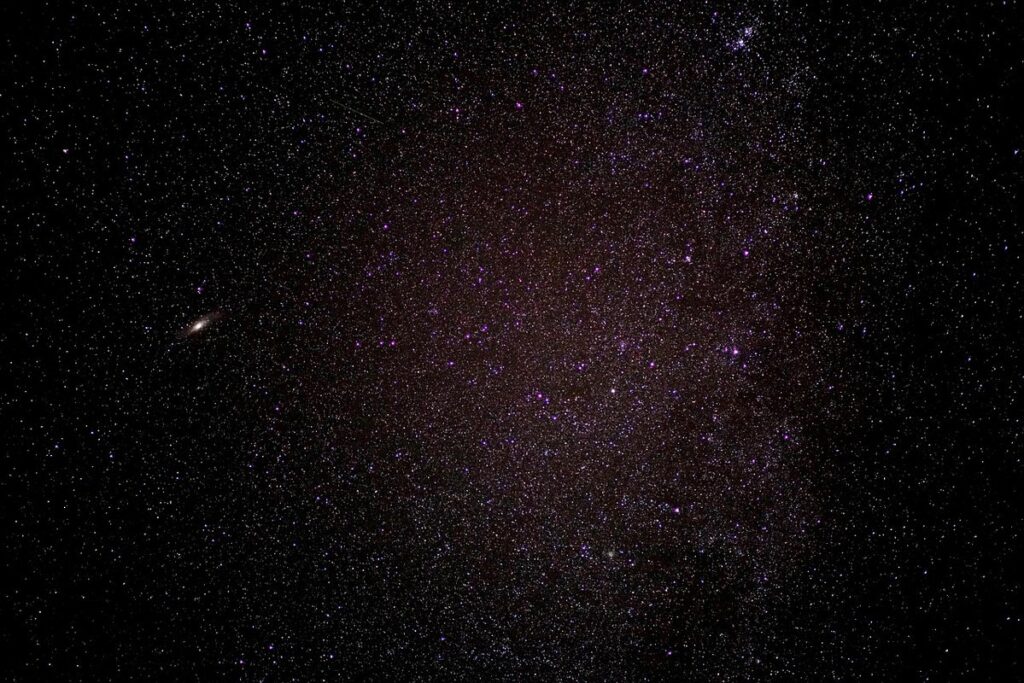
To locate galaxies, focus on the brighter ones like Andromeda (M31) or Triangulum (M33). These can be challenging to spot with the naked eye but are easily visible with a pair of binoculars. When using binoculars or a telescope, use a star chart or planisphere to help you locate these objects.
Some notable deep-sky objects for beginners include:
- M27: The Dumbbell Nebula
- M13: The Hercules Globular Cluster
- M57: The Ring Nebula
These can be found in the northern hemisphere and are visible on clear nights from October to April.
Using Red Light Flashlights for Optimal Stargazing Conditions
When stargazing, minimizing light pollution is crucial for optimal viewing conditions. Artificial lighting can overwhelm our dark-adapted vision, making it challenging to see faint celestial objects. One effective solution is using red light flashlights. These specialized lights emit a reddish hue that preserves the night-vision adaptation of your eyes.
Red light does not disrupt the sensitive rods in your retina, which are responsible for peripheral and low-light vision. By illuminating only what you need to see, you can maintain your dark-adapted state without compromising your stargazing experience. When choosing a red light flashlight, look for one with a high IR (infrared) content – this will help minimize the impact on your night vision.
In practice, using a red light flashlight is straightforward: simply switch it on and use it to navigate around your observing area or locate specific objects in the sky. Some flashlights even come with adjustable brightness settings, allowing you to tailor the illumination level to suit your needs. By incorporating a red light flashlight into your stargazing kit, you can significantly enhance your viewing experience while minimizing light pollution’s impact.
Advanced Techniques: Imaging and Photography
Now that you’re comfortable with your stargazing gear, let’s explore more advanced techniques for capturing stunning images of the night sky. This includes tips on astrophotography and camera settings to enhance your visual experiences.
Setting Up Your Camera or Smartphone for Astrophotography
When attaching a camera or smartphone to a telescope, binoculars, or tripod for astrophotography, ensure you have the correct adapters. Most telescopes come with a T-thread adapter for camera mounts. If not, purchase a universal adapter that fits your specific equipment. For smartphones, use a phone adapter that connects via Wi-Fi or Bluetooth.
To optimize exposure and focus, check your device’s settings. Set the ISO to 800-1600 for most cameras, and adjust as needed. A lower ISO will result in less noise but may require longer exposure times. Use a wide-angle lens (between 10-24mm) for capturing broad vistas or panoramic shots. For sharper images, use a prime lens with an aperture of f/2.8 or wider.
When using a smartphone, enable the camera’s manual mode and set the focus to infinity. If available, use the “Star” or “Night” mode for improved image quality. Tripod-mounted cameras benefit from remote shutter release or the camera’s self-timer to minimize vibrations.
Understanding Exposure Times and Image Processing
When capturing images of celestial objects, understanding exposure times and image processing is crucial for producing high-quality photos. The exposure time, measured in seconds or minutes, determines how much light reaches the camera’s sensor. A longer exposure time allows more light to enter, but it also increases the risk of overexposure, which can lead to distorted images.
ISO settings also play a vital role in astrophotography. The ISO controls the camera’s sensitivity to light, with lower ISOs ideal for bright objects and higher ISOs suitable for fainter targets. A low ISO setting (around 800-1600) is often used for capturing planetary images, while a higher ISO (3200-6400) may be necessary for deep-sky objects.
Image processing software like Adobe Lightroom or StarStaX helps to optimize and enhance astrophotography images. These programs can adjust exposure levels, correct color casts, and even remove noise from the image. When working with these tools, it’s essential to understand the basic controls and settings, such as the histogram and white balance. This allows you to make informed decisions about your image processing workflow. By mastering exposure times and image processing techniques, you can take your stargazing photography to the next level.
Capturing the Moment: Tips for Successful Stargazing Photography
When capturing stargazing images, composition is key. Consider the rule of thirds, placing prominent celestial bodies along the lines or at their intersections. Avoid centering your subject directly above or below; instead, offset it to create a more dynamic image. The night sky’s vastness can be overwhelming, but framing within a smaller context – like a constellation pattern or between two trees – helps convey scale.
Focus is crucial when aiming for sharp images of distant objects. Use the camera’s live view or focus peaking to ensure your subject is in sharp focus. With longer exposure times, even slight movement can blur your image. If possible, use an equatorial mount or a camera with built-in image stabilization to minimize shake and vibrations.
Timing is also essential for capturing stunning stargazing images. Be prepared to shoot during the best viewing hours (typically when the sky is at its darkest) and be aware of any moon phase that may interfere with your shot. Consider using a remote shutter release or the camera’s timer function to avoid camera shake caused by pressing the shutter button directly.
Frequently Asked Questions
Can I start stargazing in a light-polluted area and still see anything?
Yes, while it’s ideal to stargaze in dark-sky preserves or areas with minimal light pollution, you can still observe the night sky in light-polluted areas. Look for constellations that are high in the sky, as they will be more visible above the bright city lights.
How do I know when a planet is at its best viewing time?
Planets like Jupiter and Saturn are usually brightest when they’re at opposition, which occurs every 13-14 months. However, it’s essential to check astronomical apps or websites for the most up-to-date information on planetary visibility and optimal viewing times.
What if I get motion sickness while using a telescope or binoculars?
Yes, some stargazers experience motion sickness due to the gentle rocking motion of the tripod or the movement of the stars themselves. To alleviate this, try practicing with smaller movements, taking breaks, or adjusting your equipment’s stabilizers for smoother panning.
Can I use my smartphone to take astrophotography images at high magnification?
Yes, smartphones can be used for astrophotography, but they typically work best when set up as a camera attachment on a tripod. High-magnification shots are challenging with smartphones due to their smaller sensors and limited optical zoom capabilities.
How do I preserve my night vision if I need to check equipment or move around during stargazing?
Yes, minimize your exposure to white light by using red light flashlights when inspecting equipment or navigating in the dark. This preserves your dark-adapted vision, allowing you to see more stars and details in the night sky.