
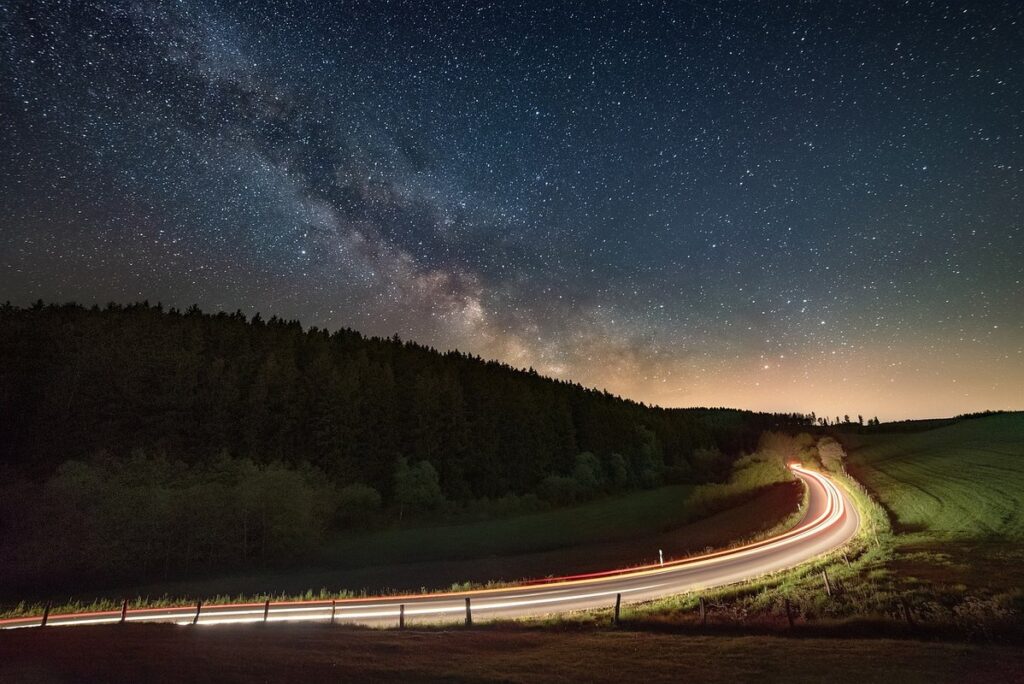
Capturing the breathtaking beauty of the night sky is a dream shared by many astrophotographers. However, it requires more than just good camera equipment; it demands a combination of technical knowledge and creative vision. In this comprehensive guide, we’ll walk you through the essential steps to photograph the night sky like a pro. From selecting the right equipment to planning your location, mastering technical aspects, and expertly post-processing your images, we’ve got you covered. Whether you’re an amateur photographer or an experienced astrophotographer, our tips and techniques will help you elevate your nighttime photography skills and capture stunning shots of the stars, planets, and celestial wonders above. Get ready to unlock the secrets of the night sky with us!
Understanding Your Equipment
Let’s get started with understanding what you’ll need to capture breathtaking night sky photos. This essential equipment rundown will cover the must-have gear and some optional extras to help you get the best results.
Choosing the Right Camera and Lens
When it comes to capturing breathtaking night sky photographs, choosing the right camera and lens is crucial. You’ll want a camera that excels in low-light conditions and can handle the vast dynamic range of the night sky.
DSLR (digital single-lens reflex) cameras are still a popular choice for astrophotography due to their excellent image quality and wide selection of lenses available. Mirrorless cameras, on the other hand, offer improved autofocus and reduced noise in low light. Both options work well, so it ultimately comes down to personal preference.
When selecting a lens, consider a prime lens (around 50-200mm) for its ability to produce sharp images with minimal distortion. Zoom lenses are also suitable, but they may introduce more aberrations at extreme focal lengths. A wide-angle lens can help capture the sweep of the Milky Way, while a telephoto lens allows you to isolate specific celestial objects.
To complement your camera and lens, consider investing in a sturdy tripod, remote shutter release or cable release, and an intervalometer for capturing star trails or time-lapse sequences.
Setting Up Your Camera for Nighttime Shooting
When shooting the night sky, it’s essential to understand how to use your camera’s manual settings to capture high-quality images. This is because low-light conditions require specific adjustments to achieve the best results. One crucial aspect is setting the ISO, which controls the camera’s sensitivity to light. A lower ISO (100-800) is usually ideal for astrophotography, but you may need to increase it in extremely dark environments.
Manual mode gives you complete control over your exposure settings, allowing you to fine-tune the combination of shutter speed and aperture to suit your needs. Aim for a slow shutter speed (around 20-30 seconds) to allow enough light to enter the camera, but be cautious not to introduce motion blur. A wide aperture (f/2.8 or wider) can also help by letting in more light.
To minimize camera shake and noise, use a tripod as a stable base for your camera and consider investing in image stabilization technology. Additionally, set your camera’s white balance to daylight or shade mode to avoid color casts that can occur in low-light conditions. By mastering these manual settings, you’ll be well on your way to capturing breathtaking images of the night sky.
Preparing for the Shot
Before you capture that perfect shot, it’s essential to prepare your equipment and location to ensure you don’t miss a moment of celestial beauty in the night sky. In this section, we’ll cover the key steps to get ready for photography.
Planning the Perfect Location
When it comes to photographing the night sky, choosing the right location is crucial. You can’t just point your camera at the stars and expect breathtaking results – you need a spot that’s conducive to capturing those magical moments.
First and foremost, consider dark-sky preserves or sanctuaries. These are designated areas specifically protected from light pollution, providing an unparalleled opportunity to capture the night sky in all its glory. Some popular options include Cherry Springs State Park in Pennsylvania and Big Bend National Park in Texas. Research these locations and plan your trip accordingly.
Before heading out, it’s essential to research the location thoroughly. Check for any local regulations or restrictions on photography, and ensure that you have access to the area. Also, consider the time of year and weather conditions – a clear night sky is crucial for capturing stunning astrophotography. By taking the time to plan and research your location, you’ll be well on your way to snapping incredible shots of the night sky.
Understanding the Weather Conditions
When photographing the night sky, understanding and preparing for the weather conditions is crucial to capturing stunning images. One of the most significant factors affecting nighttime photography is moon phase. A full moon can illuminate the sky, making it difficult to capture dark skies. On the other hand, a new moon phase offers optimal viewing conditions, but it’s essential to note that this timing coincides with the highest tides and increased risk of overcast skies.
Cloud cover is another critical factor to consider. Thin clouds can add texture and interest to your images, while thick clouds can obscure the stars entirely. To plan around adverse weather conditions, check forecasts for cloud cover, wind direction, and temperature fluctuations. A clear sky with minimal cloud activity during the new moon phase offers ideal conditions for capturing vibrant star trails.
To prepare for potential weather changes, it’s essential to stay flexible and be prepared to adjust your shooting schedule accordingly. Consider downloading mobile apps that provide real-time weather updates or setting up a weather station on location.
Technical Aspects of Night Sky Photography
To capture the night sky’s beauty, you’ll need to understand the technical aspects that make all the difference – from camera settings to equipment choices. Let’s dive into the details.
Understanding Star Trails and Stacking
When capturing the night sky, you may have noticed that the stars appear as tiny dots on your camera’s sensor. However, with a longer exposure time, these dots begin to move and create a beautiful swirling pattern – star trails. This phenomenon occurs due to the Earth’s rotation, causing the stars to shift positions in relation to the fixed points of the image.
To create stunning images by capturing star trails, you’ll need to take multiple exposures at different intervals. A longer interval allows for more pronounced trail effects, while shorter intervals produce smoother, less dramatic patterns. The ideal interval depends on your camera’s capabilities and the desired effect. For instance, a 30-second exposure with a one-minute interval between shots can create a mesmerizing swirling motion.
Software like StarStax, Adobe Photoshop, or Autostakkert2 can help you combine multiple exposures into a single image. These programs apply techniques like alignment, noise reduction, and blending to produce high-quality star trail images. Understanding the software and its capabilities is crucial for achieving the desired outcome. Experiment with different settings and intervals to master the art of creating stunning star trails in your night sky photography.
Managing Noise and Image Quality
When capturing the night sky, one of the biggest challenges you’ll face is managing noise and image quality. In low-light conditions, even a small amount of camera shake can introduce unwanted noise into your images, making them appear grainy or pixelated.
To combat this issue, it’s essential to use noise reduction software as part of your post-processing workflow. Some popular options include Noise Reduction Tools in Adobe Lightroom and Photoshop, as well as dedicated noise reduction software like Topaz DeNoise AI and Noiseware.
When using these tools, it’s crucial to understand the different types of noise present in your images – luminance noise (grain-like pattern) and chromatic aberration (color casts). By applying noise reduction techniques selectively, you can minimize damage to your image’s details while preserving its overall quality. Experiment with different settings and approaches to find what works best for your specific night sky photography setup.
As a general rule of thumb, it’s better to apply noise reduction in multiple passes at lower intensities rather than a single, high-intensity application that may over-process the image.
Post-Processing and Editing
Now that you’ve captured a stunning shot of the night sky, it’s time to refine your image with some essential post-processing techniques. We’ll walk you through the key steps for editing your starry photos.
Basic Editing Techniques for Night Sky Images
When it comes to editing night sky photographs, mastering the basics can make all the difference. The first step is to adjust the brightness and contrast levels of your image. This may seem straightforward, but it’s surprising how often a simple tweak can enhance the overall mood and impact of the photo. To do this effectively, use the ‘exposure’ slider in your editing software to brighten or darken specific areas of the sky, while also adjusting the contrast level to balance out the tones.
Another crucial aspect is color adjustments. Night sky images often suffer from over- or under-saturation of colors, which can detract from their natural beauty. To fix this, try using the ‘color grading’ tool to adjust the saturation levels of different hues in your image. This can help bring out the vibrant tones of stars and planets while reducing unwanted color casts.
Remember, editing is all about balance – too much tweaking can ruin an otherwise stunning shot. Experiment with small adjustments and trust your instincts when it comes to what works best for your specific photo.
Advanced Techniques: Star Trails, Light Leaks, and More
When it comes to capturing the night sky, post-processing is where the magic happens. In this advanced section, we’ll explore techniques that take your images from stunning to surreal. Let’s start with star trails – those mesmerizing streaks of light that evoke a sense of movement and timelessness.
To create realistic star trails, you can use software like Adobe Photoshop or StarStax. These programs allow you to merge multiple exposures taken at different intervals, resulting in a single image with beautifully blurred stars. For example, if you take 20 shots over the course of an hour, the software will combine them into one frame, creating smooth, flowing trails.
Light leaks can be another challenge when editing night sky images. These unwanted streaks of light often appear as bright lines or patches on your photo. To remove them, use a plugin like Adobe Camera Raw or Lightroom’s Spot Removal tool to carefully select and clone out the offending areas. By doing so, you’ll be left with a cleaner, more polished image.
Another technique worth exploring is enhancing image details using software like Nik Sharpener Pro or ON1 Photo RAW. These tools allow you to selectively apply adjustments to boost colors, contrast, and sharpness – all while maintaining the integrity of your original image. With practice and patience, you’ll be able to coax out even more depth and dimension from your night sky photos.
It’s essential to remember that post-processing is an iterative process. Experiment with different techniques and software until you find what works best for you. And don’t be afraid to try new things – after all, the most striking images often result from bold experimentation.
Tips and Tricks from Experienced Photographers
We’ve gathered expert advice from seasoned photographers who’ve mastered the art of capturing the night sky, sharing their tried-and-true techniques to help you improve your skills.
Insights from Seasoned Night Sky Photographers
We caught up with several seasoned night sky photographers to gain insights into their expertise and learn from their experiences. One common thread among them was the importance of location scouting and planning ahead. “I always research potential locations months in advance,” says renowned astrophotographer, John Granville. He recommends using tools like Dark Site Finder or Stellarium to identify areas with minimal light pollution.
When asked about their favorite locations, many photographers pointed to remote national parks or protected areas. “Big Bend National Park in Texas is one of my go-to spots,” shares Sarah Rose, a landscape and astrophotography specialist. She notes that the park’s dark skies offer breathtaking views of the Milky Way during peak season.
Another crucial aspect of capturing exceptional night sky images is understanding camera settings and techniques. Many photographers emphasized the importance of using manual focus, wide-angle lenses, and longer exposure times to capture the full majesty of the stars. “I always shoot in RAW format and use a tripod to ensure sharpness,” advises Mark Taylor, a veteran astrophotographer.
Remember that each location has its unique characteristics, and it’s essential to adapt your techniques accordingly. By learning from these seasoned photographers and understanding the importance of planning and technique, you’ll be well on your way to capturing stunning night sky images.
Common Mistakes to Avoid in Night Sky Photography
When venturing into night sky photography, it’s easy to get caught up in the excitement and overlook crucial details. One of the most common mistakes beginners make is underestimating the importance of a stable tripod. A shaky camera can ruin an otherwise perfect shot, so invest in a sturdy tripod that can withstand windy conditions.
Another critical error is neglecting to focus on infinity. This might seem obvious, but it’s surprising how often photographers forget to switch their camera to manual focus and set it to infinite focus. To avoid this mistake, practice focusing on distant objects during the day, and make sure your camera is set to the correct mode for night photography.
It’s also essential to familiarize yourself with your camera’s noise reduction settings. Overexposure can lead to grainy images, so learn how to balance exposure compensation with ISO settings to achieve a smooth, starry effect.
Conclusion: Capturing the Magic of the Night Sky
As you’ve now mastered the basics of capturing stunning night sky photos, let’s focus on distilling the key takeaways from your newfound skills.
Recap of Key Takeaways
As you’ve reached the end of this comprehensive guide, let’s recap the essential knowledge gained to help you capture stunning night sky photographs. Remember that mastering the art of astrophotography requires patience, practice, and a solid understanding of key concepts.
You now know how to choose the right equipment, including cameras, lenses, tripods, and remote controls, to ensure sharp images in low-light conditions. Understanding the importance of location scouting has helped you identify dark-sky preserves and optimal viewing areas for minimizing light pollution. You’ve learned how to plan your shoot based on celestial events, moon phases, and weather forecasts.
Additionally, you’re now familiar with basic camera settings such as long exposure, ISO management, and white balance adjustment. Practice has shown that combining these techniques allows for breathtaking star trails and Milky Way captures. Lastly, remember the importance of editing and post-processing to enhance your images without overdoing it. By incorporating these best practices into your workflow, you’ll be well on your way to capturing stunning night sky photographs that inspire awe in others.
Final Tips and Encouragement to Keep Exploring
As you conclude this comprehensive guide to photographing the night sky, we hope that you’ve not only gained valuable knowledge but also captured some breathtaking images of the stars. Remember, mastering the art of night sky photography is a continuous learning process, and it’s essential to stay curious and keep experimenting with new techniques.
You don’t have to stop here; in fact, this is just the beginning. Keep pushing your creative boundaries by trying out different camera settings, experimenting with various post-processing software, and exploring new locations that offer unique astronomical views. Don’t be afraid to make mistakes – they’re an essential part of the learning process.
To further enhance your skills, consider attending photography workshops or joining online forums where you can connect with experienced photographers and learn from their expertise. Some recommended resources include the NASA Astronomy Picture of the Day website, which features stunning images of the night sky along with informative captions, and the Starry Night software, a powerful tool for simulating the night sky and planning your shoots.
Lastly, don’t forget to share your passion for night sky photography with others! Join local astronomy clubs or create a social media group to showcase your work and inspire fellow enthusiasts. The beauty of the night sky is a gift that’s meant to be shared – keep exploring, experimenting, and capturing its magic.
Frequently Asked Questions
Can I still capture good night sky photos with a smartphone camera?
Yes, with the latest smartphone cameras equipped with advanced image processing capabilities and high-quality sensors, you can take amazing night sky photos using your phone. However, keep in mind that achieving professional-level results will require careful planning, use of external accessories like tripods and lenses, and post-processing techniques.
How do I deal with camera shake when photographing the night sky?
Camera shake is a common issue when shooting at long exposures, causing blurry images. To minimize this, use a sturdy tripod or camera rig, set your camera to its lowest ISO setting, and consider using image stabilization features in your lens or camera body.
What’s the best way to prepare for changing weather conditions while photographing the night sky?
Monitor local weather forecasts closely before heading out to photograph the night sky. Be prepared to adapt your plans according to forecast updates, and have a backup plan in case of unexpected changes. Bring necessary gear like extra batteries, memory cards, or even a portable generator if needed.
Can I use a wide-angle lens for capturing the Milky Way?
While it’s technically possible, using a wide-angle lens can introduce more distortion and aberrations when capturing bright stars and celestial objects. A focal length between 24-50mm is often recommended to balance the field of view with minimal distortion.
How do I manage noise in my night sky photos during post-processing?
Noise reduction is essential for achieving professional-looking results in low-light images. Use noise reduction software like Adobe Lightroom, Noise Reduction or similar tools to carefully remove digital artifacts while preserving image details and texture.