
Are you tired of dull, tarnished silver surfaces? Whether you’re a jewelry enthusiast or a homeowner with silver fixtures, keeping your metallic treasures shining can be a challenge. That’s why we’ve put together this comprehensive silver polishing guide to help you achieve professional-grade results at home. From choosing the right polishing cloths and creams to mastering advanced techniques like buffing and wheel polishing, we’ll cover it all.
In this article, we’ll walk you through the essential tools and materials needed for effective silver polishing, including popular polish types and recommended application methods. We’ll also delve into some expert-approved tips for maintaining your newly polished surfaces, ensuring they stay tarnish-free for months to come. By following our step-by-step guide, you’ll be on your way to becoming a silver polishing pro in no time!
Choosing the Right Tools and Materials
To ensure your silver polishing project turns out flawlessly, let’s start by choosing the right tools and materials for the job. This includes selecting a suitable polish, cleaning solution, and other necessary supplies.
Understanding Silver Types
When it comes to silver polishing, understanding the type of silver you’re working with is crucial. Sterling silver (92.5% silver) and fine silver (99.9% silver) are two common types that have different polishing requirements.
Sterling silver is often used for jewelry and decorative items due to its affordability and durability. To polish sterling silver, use a gentle approach with mild soap or a specialized cleaner, followed by a soft cloth buffing. Avoid using harsh chemicals or abrasive materials that can scratch the metal. For example, when cleaning a sterling silver pendant, gently scrub it with a soft-bristled toothbrush and mild soap before rinsing and drying.
Fine silver, on the other hand, is softer and more prone to scratches. It requires a more delicate polishing approach using a high-quality polish specifically designed for fine silver. To avoid damaging the metal, always follow the manufacturer’s instructions and test the polish on a small, inconspicuous area first.
Selecting the Perfect Polishing Cream
When it comes to selecting the perfect polishing cream for your silver items, you’re spoiled for choice. The market is flooded with various types of creams that cater to different needs and surfaces. Let’s break down the most common types of polishing creams available.
You’ll typically find two main categories: non-ionic and ionic polishing creams. Non-ionic creams are gentle and suitable for delicate items, while ionic creams are more aggressive and ideal for heavily tarnished pieces. Some popular ingredients include micro-abrasives like cerium oxide or aluminum oxide, which help remove scratches and grime.
When choosing a cream, consider the surface type of your silver item. For example, if you’re dealing with sterling silver, look for creams specifically designed to tackle its unique properties. Be wary of harsh chemicals that might damage certain surfaces. A good rule of thumb is to read reviews, check ingredient lists, and start with a small test area before applying the cream liberally.
Some popular brands offer specialized formulas for specific tasks, like removing oxidation or restoring silver’s original luster. Experimenting with different creams can help you find what works best for your collection.
Essential Equipment for Silver Polishing
To achieve professional-grade silver polishing results, it’s essential to have the right equipment on hand. Let’s start with the basics: cleaning cloths. Microfiber cloths are ideal for their gentle yet effective cleaning power. They’re also machine washable and can be reused multiple times. Another crucial tool is a buffer, which helps remove stubborn tarnish and scratches. There are various types of buffers available, including electric buffers and manual buffs.
When it comes to polishing solutions, look for those specifically designed for silver. These typically contain mild abrasives and anti-tarnish agents that won’t damage the metal. Avoid using household cleaners or abrasive materials, as they can scratch or discolor your silver. Other tools you’ll find useful include a soft-bristled brush for dusting and a polishing wheel for fine-tuning surfaces.
When selecting equipment, consider the type of silver item you’re working with. For delicate pieces like intricate jewelry, opt for gentler cleaning methods and finer-grade polishes. On the other hand, for larger or more damaged items, a more aggressive approach may be necessary.
Preparing Your Silver Pieces for Polishing
Before you start polishing, make sure your silver pieces are clean and free of dirt, dust, and oils that can interfere with the polish’s effectiveness. Remove any tassels, clasps, or other loose parts first.
Cleaning and De-greasing
Before you start polishing your silver pieces, it’s essential to give them a good cleaning and de-greasing. Dirt, grime, and oils can accumulate on the surface of your silver items, causing scratches and damage if not removed properly. Imagine trying to polish a dirty car – it won’t shine like new, right? Same goes for silver polishing.
When cleaning your silver pieces, use a soft, dry cloth to wipe away any loose debris. For tougher stains or grime buildup, mix a solution of mild soap and warm water, and gently scrub the area with a soft-bristled brush. Rinse the item thoroughly with clean water, then dry it with a soft cloth.
Avoid using harsh chemicals or abrasive materials that can damage the silver’s surface. Instead, use a gentle de-greaser like baking soda and water to remove any stubborn oils or grime. For example, if you’ve been storing your silver jewelry in a leather pouch, the oils from the leather may have transferred onto the metal. A gentle scrub with baking soda and water should do the trick.
Remember, cleaning and de-greasing is an essential step in preparing your silver pieces for polishing. It ensures that your polish adheres evenly to the surface, resulting in a brighter, more vibrant finish.
Removing tarnish and oxidation
Removing tarnish and oxidation is an essential step in preparing your silver pieces for polishing. Tarnish and oxidation can cause unsightly discoloration and make it difficult to achieve a high-gloss finish. Fortunately, there are several methods you can use to remove them using chemical treatments or home remedies.
One popular method is to use a commercial tarnish remover, such as Goddard’s Silver Polish or Weiman Silver Jewelry Cream. These products contain gentle abrasives and chemicals that break down the tarnish, making it easy to wipe away with a soft cloth. For tougher cases, you can try using a mixture of baking soda and water to create a paste. Apply the paste to the affected area and let it sit for 15-30 minutes before rinsing off.
Another home remedy is to soak your silver pieces in a mixture of equal parts white vinegar and water for several hours or overnight. This will help loosen and dissolve the tarnish, making it easy to clean with a soft cloth. Regardless of which method you choose, always make sure to rinse your silver piece thoroughly after removing the tarnish to prevent any residue from interfering with the polishing process.
Drying and Preparation
Drying techniques play a crucial role in preparing silver pieces for polishing. The goal is to remove excess moisture and prevent water spots from forming during the drying process. One method is to use compressed air or a blower to gently blow away loose dust and debris, then let it air dry. This approach can be effective, but caution must be exercised not to blow dirt into crevices.
For delicate or intricate pieces, placing them on a soft cloth or paper towel and letting them air dry slowly is recommended. This method prevents water spots from forming and allows for even drying. Another technique involves using a clean, dry cloth to gently pat the piece, allowing excess moisture to evaporate more quickly.
Temperature control and humidity considerations are also essential when preparing silver pieces for polishing. A room temperature between 65°F to 75°F (18°C to 24°C) is ideal, as this range allows for even drying without promoting mineral buildup or tarnish.
Basic Polishing Techniques
To master silver polishing, you’ll need to start with some fundamental techniques that will give you a solid foundation for tackling more complex projects and items. We’ll cover these essential methods next.
Circular Motion vs. Back-and-Forth
When it comes to polishing silver, using the right motion is crucial to avoid scratching and damaging the surface. Two common techniques are circular motion and back-and-forth. Let’s explore both methods to determine which one is best suited for your polishing needs.
Circular motion involves moving your cloth in a continuous circle, starting from the center of the piece and working your way outwards. This technique is ideal for large, flat surfaces as it helps distribute heat evenly and prevents over-polishing in one spot. For example, when polishing a silver platter or tray, circular motion is an excellent choice.
On the other hand, back-and-forth motion involves moving your cloth in a straight line, alternating directions with each stroke. This technique is better suited for intricate designs or small areas where precision is key. When polishing a silver vase or ornamental box, back-and-forth motion allows you to navigate tight spaces and avoid missing details.
To avoid scratches, it’s essential to maintain consistent pressure while using either technique. Always polish in the direction of the metal grain to prevent creating grooves or swirl marks.
Pressure Control and Buffing Speed
When it comes to polishing silver, applying the right amount of pressure is crucial for achieving optimal results. Too little pressure and the polish may not be effective, while too much pressure can cause scratching or even damage to the surface. To get it just right, start by holding the buffer at a 45-degree angle and applying gentle downward pressure.
As you buff, gradually increase the pressure in small increments, taking care not to press too hard on any one spot. Keep an eye out for signs of scratches or excessive wear – if you notice either, ease up on the pressure immediately.
Controlling the speed of your buffer is also vital for achieving a high-quality finish. Too fast and the polish won’t have time to penetrate evenly; too slow and you may end up with uneven marks or swirls. A good rule of thumb is to start at a moderate setting (around 2,000-3,000 RPM) and adjust as needed based on the type of polish you’re using.
Some popular silver polishes are designed specifically for high-speed buffing, while others require a slower speed for optimal results. Be sure to check your product’s instructions for specific guidance.
Avoiding Common Mistakes
When it comes to silver polishing, it’s easy to get carried away with the process. However, over-polishing can be just as detrimental as not polishing enough. Over-polishing can lead to scratches, pitting, and even damage to the underlying metal.
To avoid this common mistake, start by checking your polish for the right level of grit. A good rule of thumb is to work from coarse to fine, gradually increasing the polish’s fineness until you reach a mirror-like finish. This will help prevent over-polishing and ensure that you’re making progress without damaging the silver.
Another pitfall to watch out for is using excessive force when polishing. Using too much elbow grease can scratch or wear away the silver, so it’s essential to work gently but firmly instead. Think of it as a dance between polishing and caressing – use just enough pressure to get the job done without causing harm.
By being mindful of these potential pitfalls, you’ll be well on your way to achieving a beautifully polished piece of silver that shines like new.
Advanced Polishing Techniques
For those looking to take their silver polishing skills to the next level, we’ll dive into advanced techniques that produce showroom shine on even the most intricate pieces. This includes methods for removing stubborn tarnish and achieving a high-gloss finish.
Staining and Pattern Creation
Creating unique patterns and designs on silver surfaces is an art form that requires skill, patience, and practice. With the right materials and techniques, you can transform a dull metal surface into a work of art. One popular method for creating patterns is using acid etching. This process involves applying a mixture of acid and water to specific areas of the silver surface, which then reacts with the metal to create intricate designs.
To achieve this look, you’ll need nitric acid, a brush, and a protective glove. Start by carefully applying the acid mixture to your design, making sure to work in a well-ventilated area. The acid will etch the metal, revealing a beautiful pattern of lines and textures. Be cautious not to overdo it, as too much acid can damage the surface.
Another method for creating patterns is using specialized polishes or stains. These products come in a range of colors and can be applied in various ways, from subtle shading to bold, vibrant designs. For example, you could use a blue or purple polish to create a stunning night sky effect on your silver piece.
Combining Polishing with Other Techniques
When it comes to creating intricate designs on silver pieces, combining polishing with other metalworking techniques can elevate your work to the next level. One way to achieve this is by pairing polishing with engraving or etching.
By using a combination of polishing and engraving, you can create detailed textures and patterns that add depth and visual interest to your designs. For example, you could polish a silver pendant to a high shine, then use an engraver to add intricate details, such as floral patterns or scrollwork. This technique is particularly effective for creating unique, handcrafted pieces.
Another approach is to combine polishing with etching. By using acid or a chemical etchant to create a design on the surface of the silver, you can achieve striking contrast and visual interest. For instance, polish a silver ring to a mirror finish, then use an etchant to create a delicate, lace-like pattern. This technique is ideal for creating intricate designs that require precision and control.
When combining polishing with other metalworking techniques, remember to follow proper safety protocols and experiment with different materials and tools to achieve the desired effect. With practice and patience, you can unlock new creative possibilities and take your silver polishing skills to a whole new level.
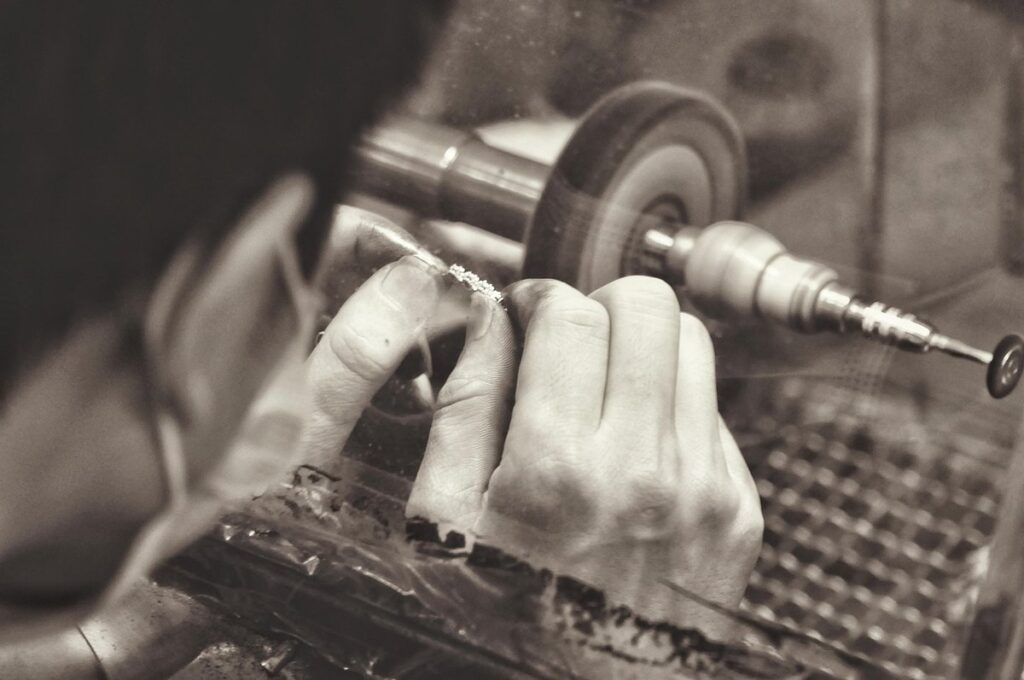
Specialized Tools for Precision Polishing
When it comes to precision polishing intricate areas of silver, having the right tools for the job is crucial. Specialized equipment designed specifically for this purpose can make all the difference between a mediocre finish and a showroom-quality shine.
One such tool is the flex shaft or flexible drive, which allows for precise control over delicate areas like filigree or engraved details. This versatile instrument features a long, thin cable that attaches to your polishing motor and can be maneuvered with ease into tight spaces. Its flexibility makes it perfect for navigating intricate designs without applying too much pressure.
Another essential tool is the polishing lathe or micro-motor, which provides high-speed rotation with minimal vibration. These devices are ideal for precision polishing flat surfaces, curved areas, or rounded details. Some models even come equipped with interchangeable drive shafts and various attachments, such as buffs and felt wheels, to cater to different polishing needs.
When selecting specialized tools for precision polishing, consider investing in a few high-quality items that will withstand repeated use. Look for materials like stainless steel or aluminum, which are durable yet gentle on silver surfaces. Remember to choose the right grit polish for each tool to prevent scratching or marring your work.
Post-Polishing Care and Maintenance
Now that you’ve polished your silver items, learn how to keep them looking their best with these simple care and maintenance tips that’ll make a big difference. With a little TLC, they’ll shine for years to come.
Storage and Display Tips
When you’ve spent time polishing your silver pieces to a brilliant shine, it’s essential to store and display them properly to maintain their luster. To prevent tarnish and damage, follow these storage and display tips.
Proper Packaging:
Wrap each item individually in acid-free tissue paper or a soft cloth to prevent scratching and exposure to air. Store the wrapped items in airtight containers or zip-top bags to keep moisture out. Consider using small dividers or inserts to separate pieces within the container, preventing them from rubbing against each other.
Display Materials:
When displaying your silver pieces, choose materials that won’t scratch or tarnish them. Glass shelves and display cases are ideal options. If you prefer a wooden display, opt for one made from a durable, silver-friendly wood like ebony or rosewood. Avoid using velvet or other fabrics that can transfer dyes to the silver.
Additional Tips:
Store your polished silver pieces in a cool, dry place away from direct sunlight. Consider grouping similar items together, such as flatware or jewelry, to make storage and display more efficient.
Avoiding Future Tarnish
To avoid future tarnish and oxidation, it’s essential to implement preventative measures after polishing your silver items. One effective method is using anti-tarnish products. These products create a barrier between the silver and air, preventing sulfur compounds from reacting with the metal. For example, you can place anti-tarnish strips or pads in storage containers with your polished silver pieces.
Another approach is applying a protective coating to the silver surface. This layer provides an additional layer of protection against tarnish and corrosion. Consider using a clear wax polish specifically designed for silver items. This type of polish forms a hard, non-stick film on the metal that resists oxidation. Regularly applying a small amount of this polish after polishing will help maintain your silver pieces’ appearance.
Additionally, consider storing your polished silver in a cool, dry place, away from direct sunlight and moisture. You can also use a dehumidifier to maintain a stable humidity level, which helps prevent tarnish. By taking these simple steps, you’ll be able to enjoy your beautifully polished silver items for years to come.
Regular Polishing Schedule
To keep your silver surfaces looking their absolute best and maintain their value over time, regular polishing is essential. It’s not a one-time task, but rather an ongoing process that requires commitment and attention to detail.
We recommend creating a regular polishing schedule tailored to the usage of your silver pieces. For example, if you have a heavily used silver vase or centerpiece, it may need to be polished every 1-2 weeks to prevent tarnish buildup. On the other hand, less frequently used items can be polished every 2-3 months.
When scheduling your polishing sessions, consider factors such as humidity levels in your home, exposure to direct sunlight, and proximity to saltwater or other corrosive substances. A general rule of thumb is to polish silver pieces every 6-8 weeks if you live in a dry climate and use them moderately.
Remember that prevention is key; regular maintenance not only maintains the appearance but also protects your valuable silver items from damage. By incorporating polishing into your routine, you’ll enjoy your silver treasures for years to come.
Troubleshooting Common Issues
Don’t worry if you encounter obstacles while polishing your silver pieces, we’ve got you covered with practical solutions to common problems that can arise. From tarnish to scratches, we’ll walk you through how to fix them.
Identifying and Fixing Scratches
When it comes to polishing silver, minor scratches can be a real bane. Not only do they detract from the overall appearance of your piece, but they can also create an environment conducive to tarnishing and further damage. So how do you identify and repair these pesky marks?
Start by inspecting the scratch closely. Use a magnifying glass or jeweler’s loupe to get a better look. If it’s minor, you might be able to buff it out with a soft cloth and some silver polishing compound. For more significant scratches, however, you’ll need to take a more targeted approach.
One effective technique is the ” scratch-out” method. Apply a small amount of silver polish to the affected area and rub it in with a cotton swab. Then, use a soft-bristled brush to gently scrub away at the scratch. Repeat this process several times until the mark begins to fade. For more severe scratches, you may need to resort to using a metal file or sandpaper to carefully remove the damaged layer.
Keep in mind that prevention is always better than repair. Regular polishing and storage can help prevent minor scratches from becoming major issues.
Resolving Tarnish Stains
When dealing with stubborn tarnish stains on your silver pieces, it’s essential to act quickly and use the right cleaning methods. In this section, we’ll explore some specialized cleaning products and home remedies that can help remove these unsightly marks.
One popular solution is using a commercial tarnish remover, such as Goddard’s Silver Polish or Weiman Silver Jewelry Cream. These products contain mild abrasives and chemicals specifically designed to break down tarnish without damaging the underlying metal. To use them effectively, apply a small amount of the product to a soft cloth and gently rub it into the stained area in a circular motion.
Alternatively, you can try using a home remedy like baking soda and water paste or lemon juice and salt scrub. For example, mix 1 tablespoon of baking soda with 2 tablespoons of water to create a paste, then apply it to the stain and let it sit for about an hour before rinsing off with warm water. These remedies are gentler on silver than commercial products but may require more elbow grease to remove stubborn stains.
Polishing Mistakes to Avoid
When working with delicate silver pieces, it’s easy to make mistakes that can lead to damage. One common error is using the wrong tools for polishing. For example, a steel wool pad may be too harsh and scratch the surface of your silver item, while a soft cloth may not remove tarnish effectively.
To avoid this mistake, invest in a set of dedicated silver polishing cloths or pads that are designed specifically for the task. These will typically have a gentle abrasive and will help to remove tarnish without scratching the metal. It’s also essential to choose the right polish – some polishes can be too harsh and damage the silver, while others may not provide enough shine.
Another common mistake is over-polishing, which can strip away the patina or layer of protection on your silver item. To avoid this, start with a gentle polish and test it on an inconspicuous area first. If you’re unsure about how to polish a particular piece, it’s always best to err on the side of caution and seek advice from a professional.
When polishing silver, it’s also essential to work in small circular motions and avoid using too much pressure. This can help prevent scratching or marring the surface of your item.
Frequently Asked Questions
Can I use baking soda as a polishing agent for my silver pieces?
Baking soda can be used as a mild abrasive to remove tarnish, but it’s not a substitute for a proper polish. Use it with caution and avoid applying too much pressure, which can scratch the metal.
How often should I polish my sterling silver jewelry to prevent tarnishing?
Polish your sterling silver jewelry at least every 6-12 months to maintain its shine. Regular polishing will help prevent tarnish from forming and keep your pieces looking their best.
What’s the difference between a buffing wheel and a polishing cloth, and when should I use each?
A buffing wheel is used for advanced polishing techniques, while a polishing cloth is ideal for everyday maintenance. Use a buffing wheel for creating intricate patterns or removing stubborn tarnish, but reserve a polishing cloth for quick cleanups.
Can I polish silver in direct sunlight, or will it damage the metal?
Yes, you can polish silver in indirect sunlight, but avoid direct sunlight to prevent overheating and potential damage to the metal. It’s also essential to work in a well-ventilated area when using polishing creams.
How do I know if my silver piece is too fragile for polishing with a buffing wheel?
If your silver piece has intricate details or is particularly delicate, it may be best to avoid using a buffing wheel. Opt instead for a gentle polish and soft cloth to prevent scratching or damaging the metal.